


This entry was posted on October 22, 2019.
Courtesy of Vanguardworld Blog
As winner of the global "2019 Bird Photographer of the Year", Vanguard Ambassador Caron Steele has taken the time out to share some tips to help improve your nature photography...
Caron's Top 10
I’m fairly new to this game myself, I’ve only been photographing with a DSLR since 2014. However, I think I’ve learnt a lot in the short time and maybe you can learn from my mistakes!
Firstly, there are a few things that you need for all nature photography:
- Patience!
- Knowledge of the subjects you’re photographing, and/or a good sympathetic guide to advise
- Generally you'll need a long lens as most animals and birds don’t like you as much as you like them
- A reasonably fast burst rate and I generally find over 7fps is best
Obviously all situations are different and you can get some amazing wildlife shots using wide-angle lenses and fisheye lenses, but I would start with going long. I haven’t covered Macro nature photography here as that’s a whole separate ball game. Also, if you’re just taking portraits you don’t need fast burst rate.
Those basics covered, here are my 10 top tips:
1 - KEEPING IT SHARP
Often people are concerned about using higher ISO’s to get the shutter speed they need and end up with too slow a shutter speed and images that just aren’t sharp. Well in my opinion it’s much better to have a sharp image and possibly a slightly grainy one, than an out of focus shot. After all you can do so much in post-production to correct noise, you cannot correct an out of focus and blurry image
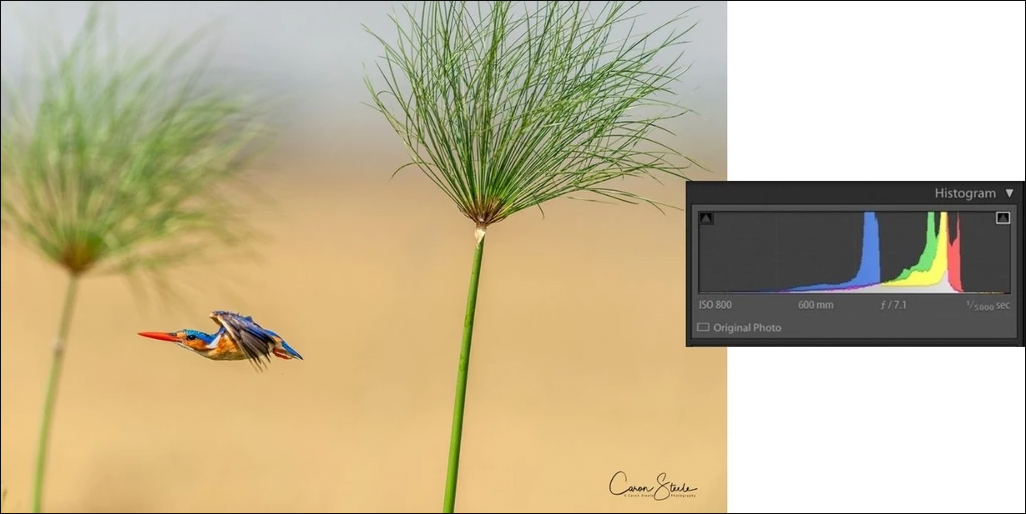
Shutter speed is key. As a rule of thumb if your subject is moving you will need a shutter speed between 1/500 -1/1500th of a second for most mammals depending on how fast they moving. For birds in flight you are generally looking at a minimum of 1/1500 to 1/4000th of a second particularly with small fast birds like the malachite Kingfisher.
Even at 1/5000sec (f7.1 ISO 800 -1 1/3 EV) the Malachite Kingfisher below is only just sharp and you can still see wing blur.
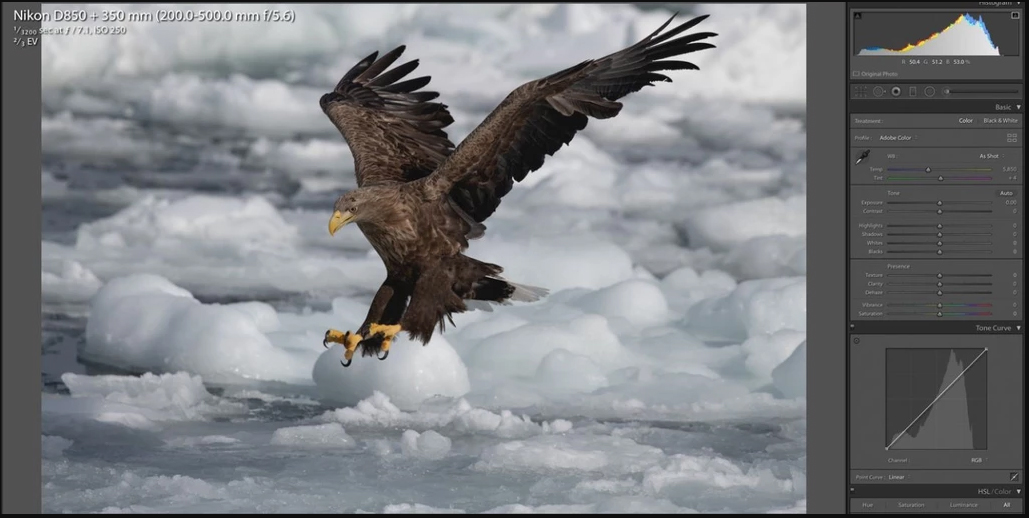
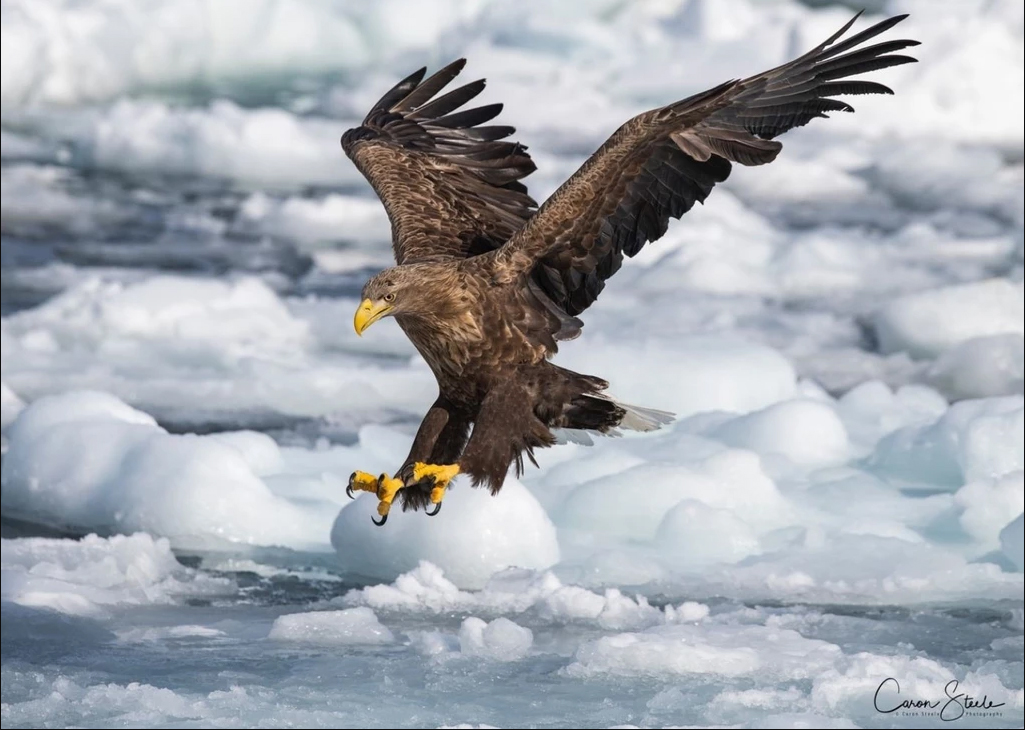
The White-tailed Eagle (Haliaeetus Albicilla) below shows the raw image straight from camera @ f7.1, ISO250, + 2/3EV, 1/3200 sec to get a sharp image, followed by final image to show what can be achieved back in the studio
2 - CLEAN BACKGROUND
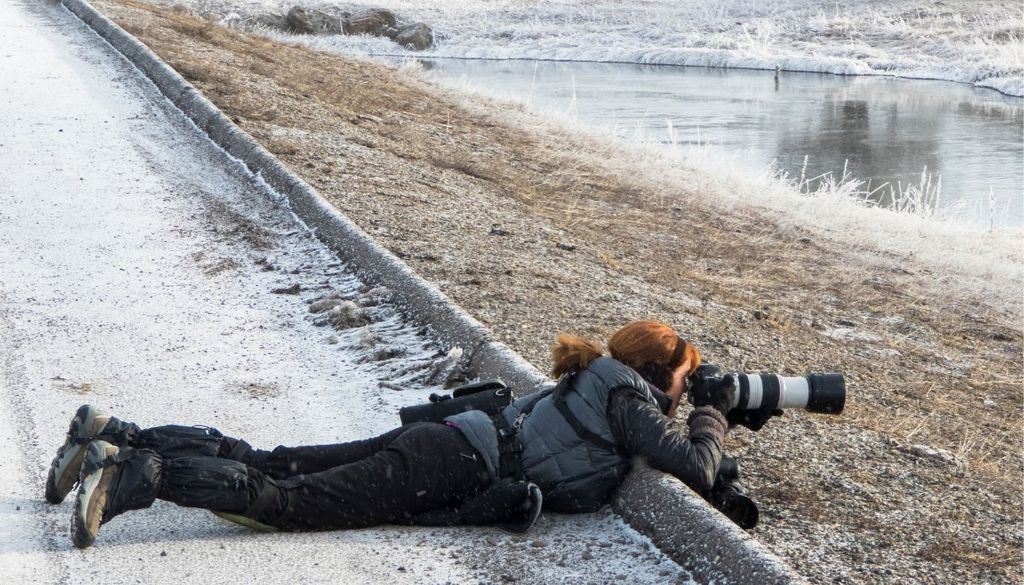
Check your background and your horizon. I know that typically you can watch an animal for ages and then the best action happens right in front of a really messy background in nature you can’t always choose the setting. Ideally you want to get as close as possible to the action without disturbing the animal behaviour and you need to try and select the shooting position that lets you get the wildlife close and the background distant, to give a nice bokeh effect.
I often shoot from lying down as this generally has two advantages. Firstly, you are eye level with the creature you are trying to photograph so you see things at their perspective. Secondly, you are not shooting down into the background you are shooting, it so it is further away, enhancing that bokeh effect.
Hopefully this dodgy drawing explains what I mean…
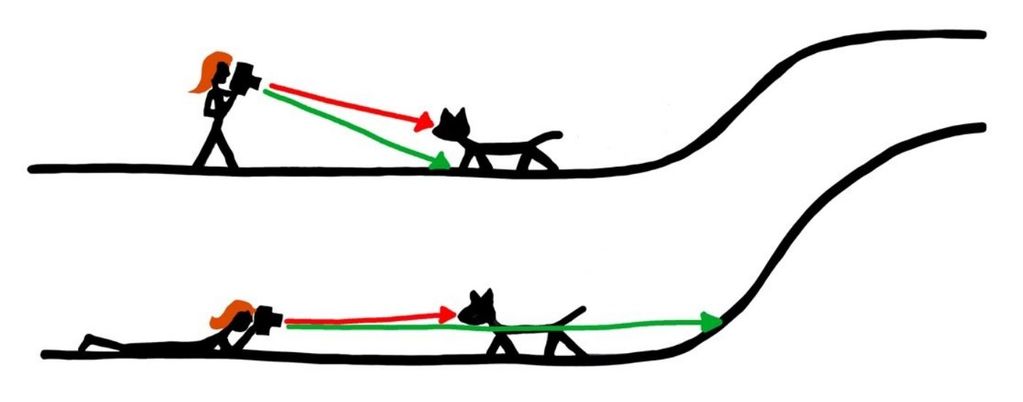
Often, if you are lying down, the distance to the background (green line) is greater than when you are standing up. This means your background will be more out of focus, giving you that lovely creamy texture that most photographers crave and the object you are focusing on stands out more.
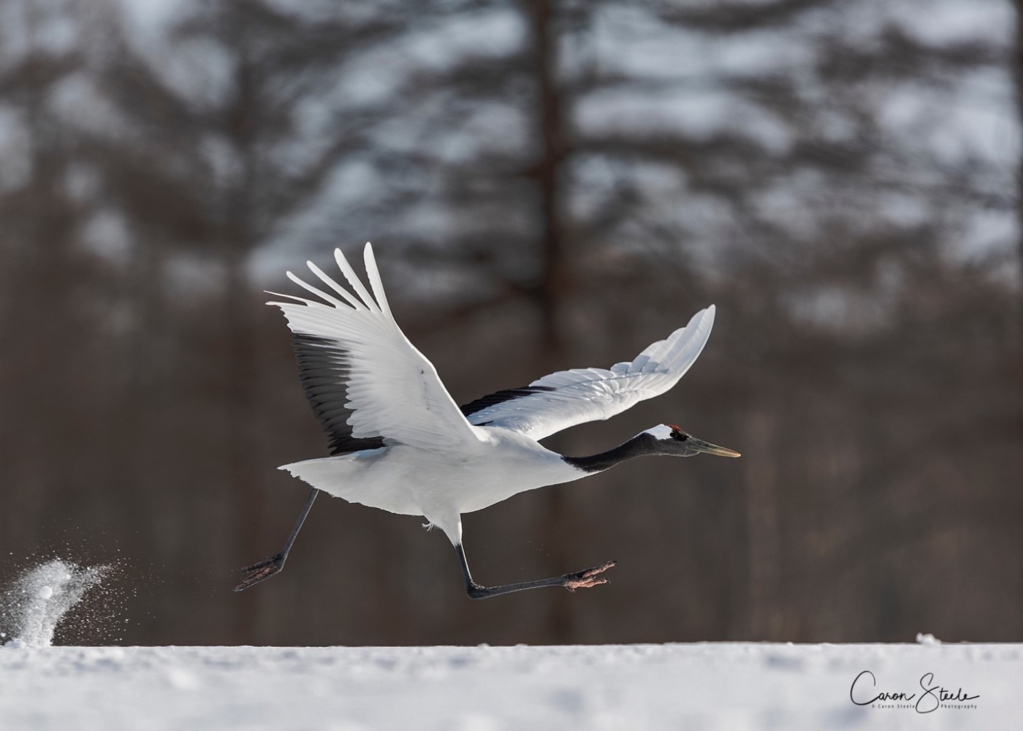
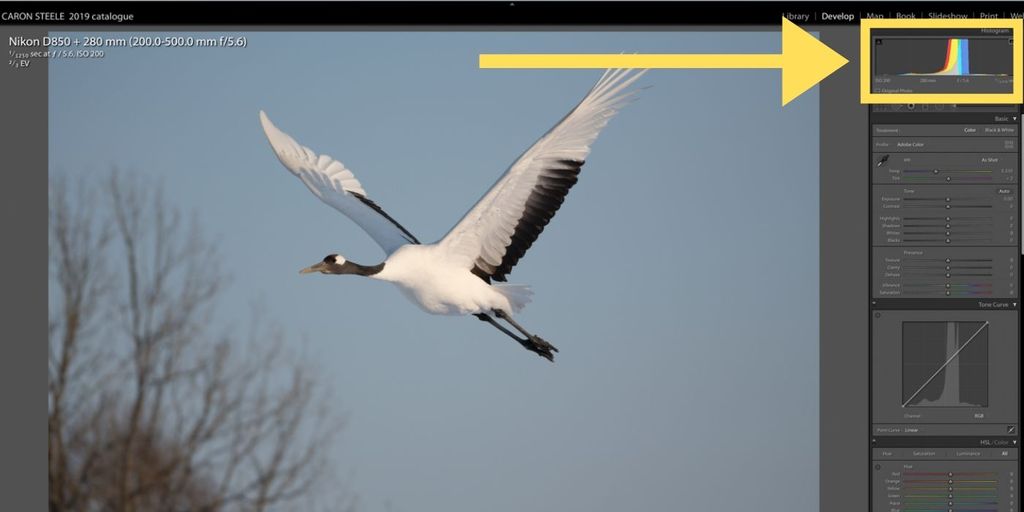
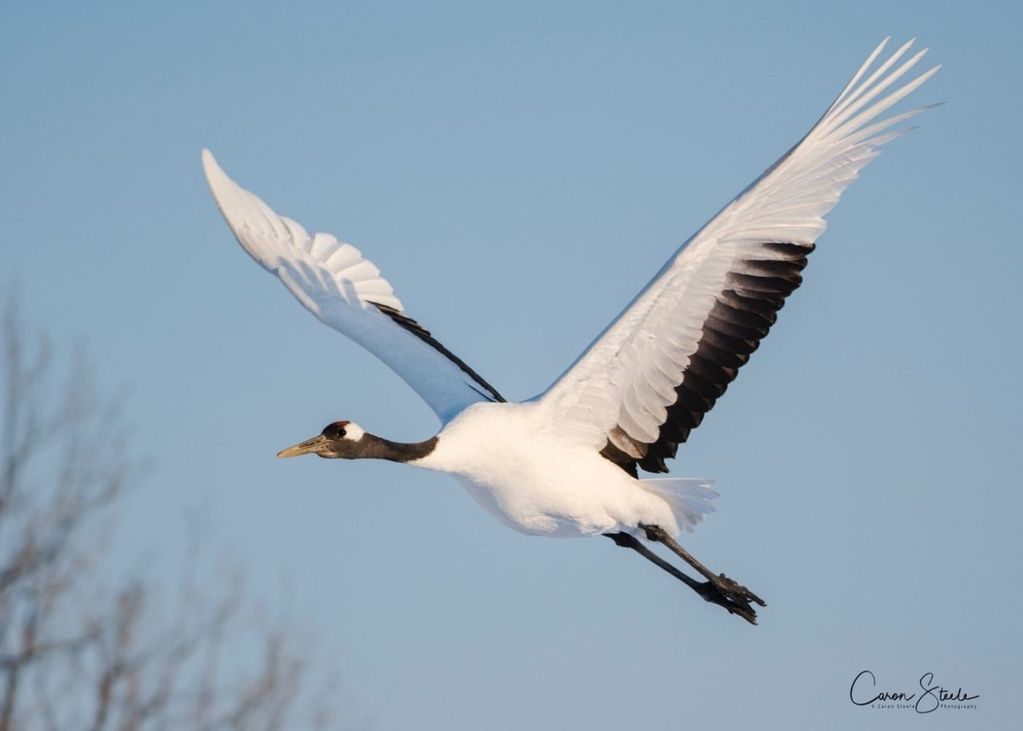
The photo above is of an endangered Red-Crowned Crane (Grus Japonensis) taking off and was taken from a low angle where I had positioned myself down the bank giving clear separation between the subject and background. Also it was a situation where I could use a tripod (a fantastic tool when you are in one location for a while).
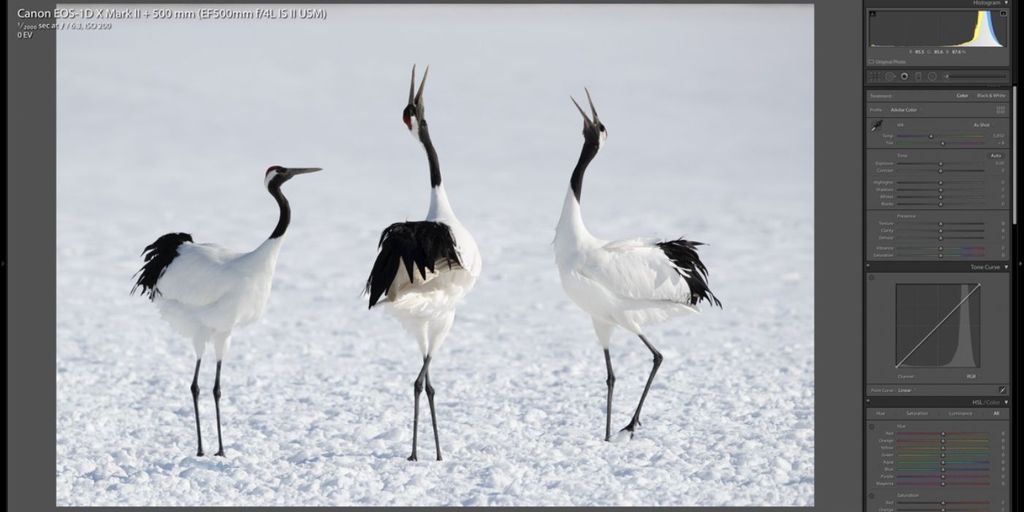
For the photo below, I actually raised myself by standing on a crate because shooting straight on would have meant the horizon cut across the birds’ necks. As the background was just white snow, I knew I didn’t have to worry about it being distracting, and so by changing the angle at which I shot, I could get a nice clean image. It was also about -20°C when I shot this, so remembering not to breathe out on my view finder and screen was key as they kept freezing over with the moisture from my breath and needed defrosting with my hand warmers!

In snow you often need to use + exposure compensation, but not always. Just do a test shot and check your histogram. This was shot at 0EV and gave me a great histogram. I also used the selective texture tool over the feathers when editing, to help bring out the detail
Below is another low angle shot giving clear separation between the subject and background.
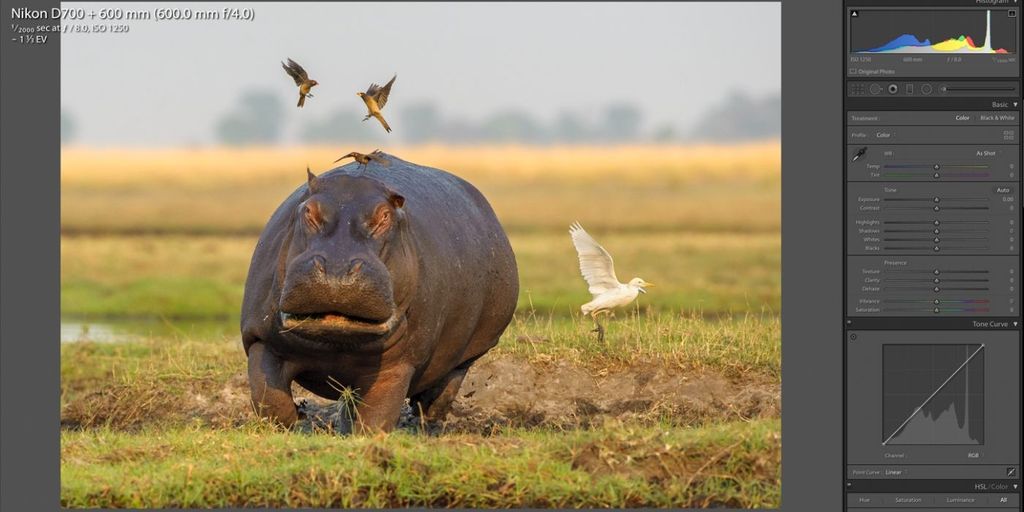
We'd seen the hippo who was obviously skittish and realised that he was heading for the water and safety, as he had been disturbed by nearby buffalo. We positioned ourselves for a good angle, but far enough away that his entry into the water was not impeded. As we approached the scene, I’d whacked my ISO up to 1250 as I wanted to catch the birds that I'd seen fluttering on the hippo's back, as well as the hippo, and needed a shutter speed of at least 2000. I had negative exposure compensation of -1 1/3 which gave me the correct histogram, and had the added benefit of giving me more shutter speed.
If you are on safari in a vehicle, never be afraid to ask them to reposition it to give you better light and background. The worst they can say is no, and then you can feed them to the lions later!
It is also a good idea to keep a close eye on your horizon. I am rubbish at this, so I use the virtual spirit level in my viewfinder and try to remember to keep checking it in the heat of the moment. If in doubt shoot a bit wider so that you have room to crop and level the horizon
3 - GOOD COMPOSITION
Try and think about your composition in advance and envisage possible scenarios before the action happens. You to give yourself half a chance to capture a great image when it does.
For example, if you want a shot of a bird in flight that you are patiently watching sitting on the branch of a tree, make sure you have left enough room in the frame for it to spread its wings when it takes off. It is amazing how big their wing spans are in comparison to their body size and it’s very easy to clip wings if you’ve been focusing on a stationary bird. Also, if you have time, scan the horizon in their possible flight path and look at the light. Think about the best point at which to take your photo, where the light and background is at its optimum, and remember that when you come to press the shutter button.
For me the pinnacle of wildlife photography is catching good animal or bird behaviour. Frequently you will find yourself in situations where your depth of field is limited. Only so much of the image can be in sharp focus. By trying to envisage possible scenarios in advance you can increase your chances of getting the right bits in focus. Usually focusing on the eyes or nose of the lead animal is your best option and if at all possible, staying parallel to the action. You have to weigh up how much of the animals you want in sharp focus vs the messy background.
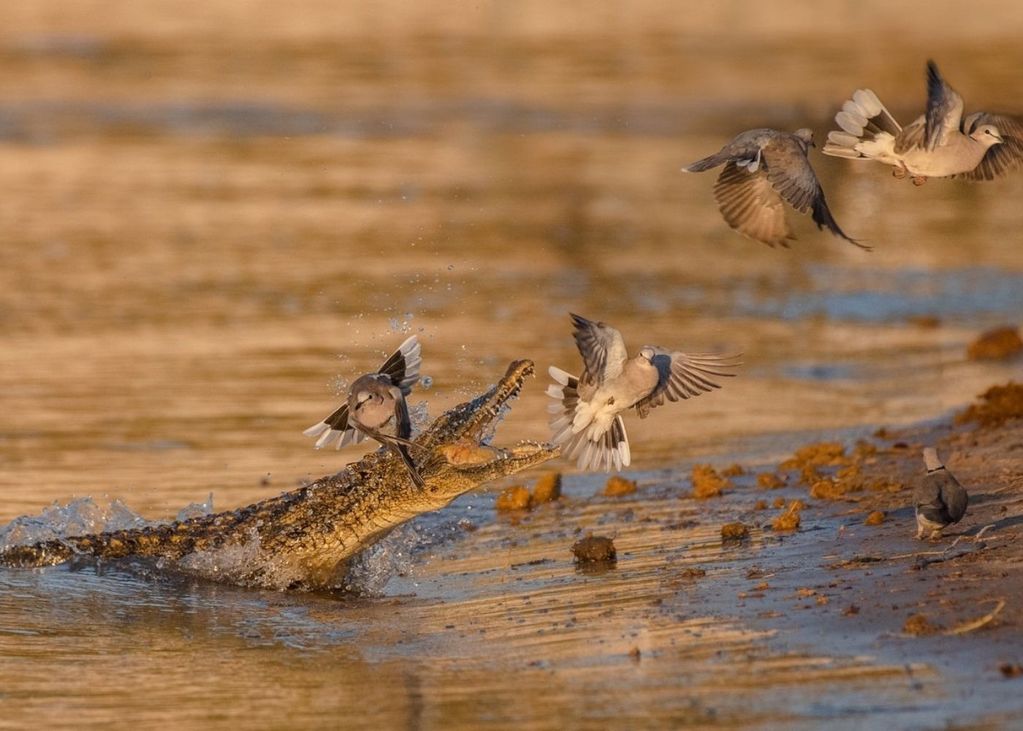
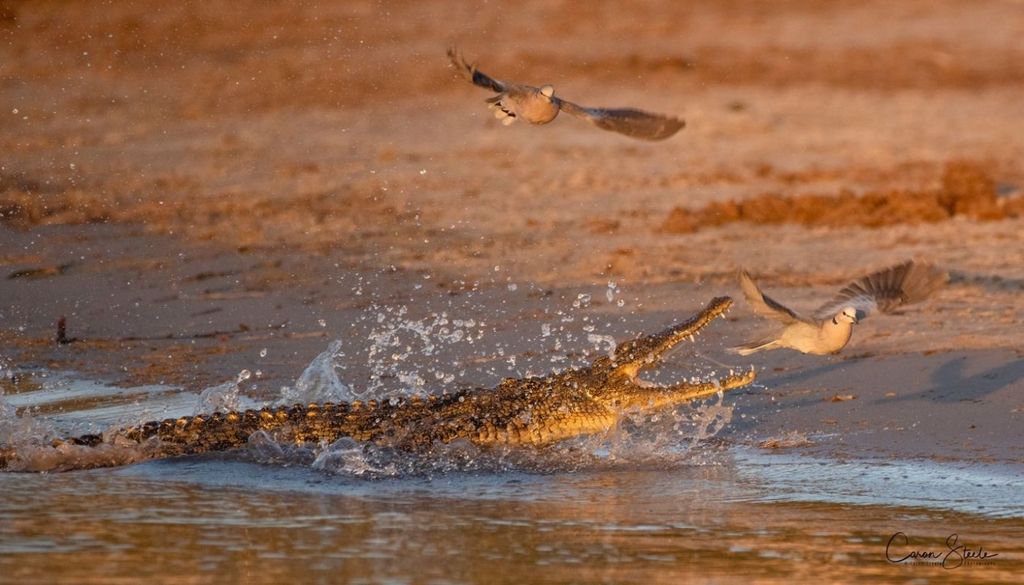
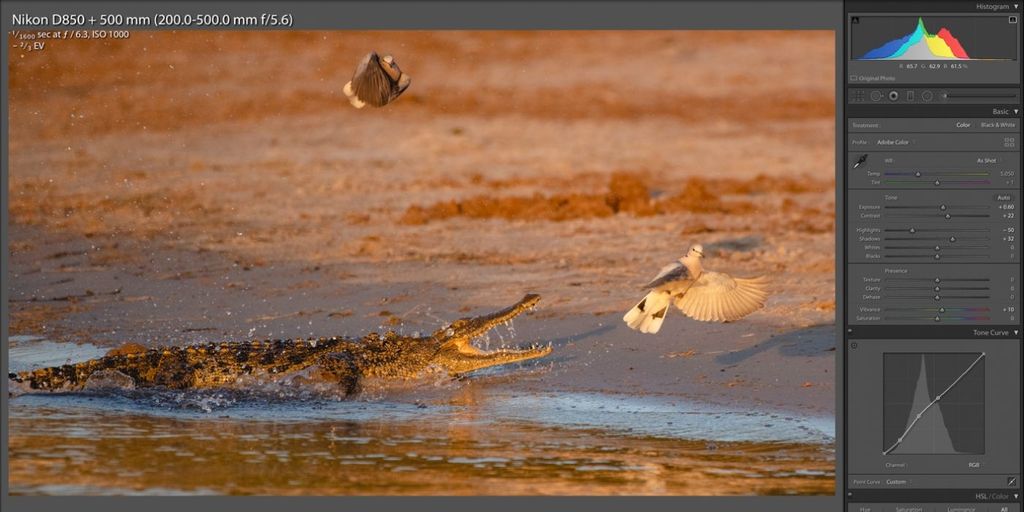
In the two photos below, I had been watching the crocodile for a while, hoping to catch some action. I had hoped it would lunge out of the water at a dove and so we positioned our boat parallel to the possible action. I sat on the floor of the boat with my camera only about 2 feet above water level and took several test shots while I waited. The light was failing, and another boat pulled up getting into my shot, but at that point there was not much I could do. I raised myself slightly higher to get the boat out of my shot and then the croc pounced! Sadly, I just got the edge of the boat behind the top doves which had to be edited out, leaving these two options.
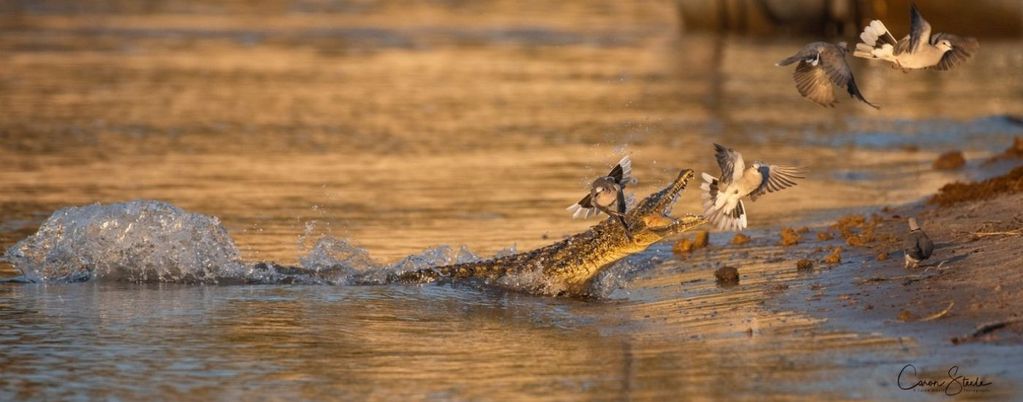
To try and avoid the annoying boat, we manoeuvred into a different position. As you can see the angle is not quite as good and the background is not as clean, but there are no boats! Also, the light was quite low by now, so my ISO was up to 1000 with -2/3 EV to give me a shutter speed of 1600. Ideally, I would have liked a faster shutter speed, but I know from experience, on my large megapixel Nikon D850, I cannot push the ISO as high as I can on my Canon 1DX II that only boasts 20 megapixels. I would also have liked a larger depth of field, but it’s all about compromise and I think this is just about right.
I generally try and get all of the animal sharp, from tip to tail, which means a large depth of field (high f-number), but with two animals fighting or interacting, that can also mean that a lot of the background is in sharp focus and is too distracting. You need to develop your own style by trial and error. I am still learning and adapting as I go, but remember with a long lens the closer you are to your subject the higher f-number going to need to keep it in focus.
You should also consider if you want to show the environment in your picture. When I started out I was very guilty of always shooting very close up shots, as I was mesmerised by the detail I could capture in camera, however this doesn’t always tell the best story and photos should always be about telling a good story. Sometimes a wildlife shot is even more powerful when the main subject is very small in the frame.

I think deciding how you want your images to look before you take them is the hardest thing you have to do with wildlife photography. Understanding a bit about the behaviour of the animals you photograph will certainly help, as you’ll be able to anticipate their behaviour better and envisage those shots.
4 - DO YOUR RESEARCH
If I'm going to photograph something, I generally do a Google search for images of that subject first. It helps form an idea of what you like and don’t like, and also show you what is the norm so you can try to think out-of-the-box.
I’m constantly looking for something a bit different. I remember before I went up to Bempton Cliffs in Yorkshire I Googled loads of Gannet images. Many were amazing but there were a lot of very similar ones. When I got there, I scouted the scene, looking for opportunities. I took a lot of fun gannet images, all the time watching their behaviour. After the gannet feeding frenzy had died down, we stayed on the water to get photos of the other birds.
It was then that I took my opportunity to focus on the few stragglers still fishing and swimming in the area. I was fascinated by their swimming skills and how they emerged through the water. Scudding clouds also made the colours on the water beautiful, but the constantly changing light was tricky and I was forever checking my histogram. It’s a little on the dark side, but better that than blown highlights.
I knew as soon as I took the shot it was a keeper, because it was different and painterly. Happily, it won the Coast & Marine Category in the 2017 British Wildlife Photography Awards.
Below is the raw file straight from camera. By increasing the exposure, lifting the shadows, dropping the highlights and adding a little bit of contrast and vibrance in Lightroom, I was able to bring all the colours and details out in the category winning photo
5 - CHECK YOUR HISTOGRAM & USE EXPOSURE COMPENSATION
I constantly check my histogram to make sure my image is exposed correctly. Get the most out of your camera by keeping the graph to the right, but not clipping the edges. You also don’t need to be afraid of underexposing by a stop when conditions are difficult and you need that extra shutter speed. I use my exposure compensation button a lot to ensure I don’t burn out my highlights, and sometimes I use a combination of ISO and under exposing with my exposure compensation to get faster shutter speeds.
With exposure compensation it’s horses for courses. Although typically I might use negative exposure compensation to avoid burning out any white highlights often found on the underside of a bird’s wings, when shooting the same bird up against a blue sky rather than a green and brown background, I often need a little positive exposure compensation. I am forever taking test shots in the field and checking my histogram, trying to keep my light levels to the right of the graph but not clipping. Putting on highlight alert for reviewing your images is a good idea when out in the field
Here I shot with +2/3 exposure compensation. Even though we are dealing with a predominantly white bird, as it is against a blue background you are likely to need + exposure compensation to give a well distributed histogram.
6 - LEARN HOW TO EDIT
There is so much to learn on the editing front and so much amazing software out there - use it. I use Lightroom and Photoshop and still only have a limited knowledge of each, which I am constantly trying to expand upon. There are so many online tutorials you have no excuse.
We all have different tastes and styles for our photography. I try to give a true to life natural image, whilst bringing out as much detail as possible. Much of what I see is very saturated and it’s very easy to go too far. I recommend working on a photo and then before doing anything with it leave it for a day and go back to it fresh and see how you feel about it then. After a while you will start to develop your own style which will inevitably change as your skills grow.
(and by the way I am loving the new texture slider in Lightroom which is great when selectively applied to fur and feather for bringing out the detail)
7 - EXPERIMENT
Challenge yourself with new projects and practise techniques on the everyday mundane. Most of us don’t get to see running cheetahs every day, but a running dog is an easy target practice on. Try a different perspective, panning shots, reflections, stitched panoramas, double exposures in camera, using flash, black and white or using different white balances.
I think my wildlife photography has improved by trying other genres of photography. I find landscape photography very difficult, but I persevere as I think it is helping me to visualise my wildlife photos so much better.
Trying new techniques and ideas is hugely beneficial. It gives you more camera confidence and helps you to create new and interesting shots. Don’t be afraid to take thousands of photos all destined for the trash in order to achieve your goal. You will only learn by your mistakes and sometimes those mistakes are happy successes.
8 - KEEP YOUR KIT CLEAN
There are few things worse than coming home with great shots to find them spoilt by dust spots and having to spend hours cloning them out. Take a blower, plenty of lens cloths, a soft brush and cleaning fluid in a zip lock bag. From time to time zoom right in on your images and check for obvious dust spots and check your lens is clean.
Always avoid changing lenses in the field, and never do it in a moving vehicle. When I do change my lenses, I try and keep the camera body facing downwards so no dust can fall in the opening when my lens is off.
I also use hotel shower caps over the end of my lens as a quick and easy way to keep the dust out, but make sure they don’t fly off and litter the countryside.
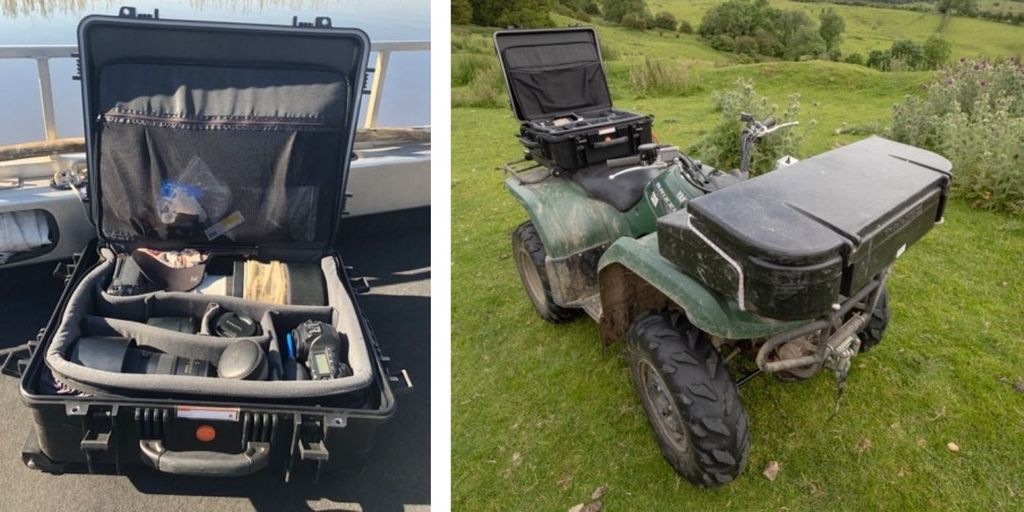
If possible I like to keep my cameras set up and accessible, but out of the dust in a bag with easy access. If I have a spare seat, I will put my Vanguard Supreme hard case on it with all my kit in. It flips open easily but everything is protected. For a heavy case its surprisingly useful if you have the space. I’ve taken it with me on the zodiacs in the Arctic, out on the river Chobe and I also strap it to the back of my quad bike so when I go out to do photography at home so I’m ready for every eventuality. As it is waterproof, dustproof and shockproof, I know my gear is safe.
9 - LEAVE NO TRACE
When you are out photographing nature, remember it is their natural behaviour that you are after and not a reaction to your presence, so approach carefully and slowly, and be aware of where you drive, walk, set up your tripod, put down your camera bag, eat your lunch, etc. Ideally you should be able to leave without a trace.
On occasions there is also a need to blend in, so camouflage clothing and no perfumes are key.
10 - STOP TO SMELL THE ROSES & ABOVE ALL HAVE FUN
Remember to take time to stop, breathe and just watch the wildlife.
I know we all fear losing that great shot by lifting our eyes from the camera (maybe that’s just me!), but if you stop to watch you learn to anticipate behaviour better and actually increase your chances of getting the shot, and more importantly it will be photographed in your mind and the whole experience will stay with you for longer.
I also try and get a quick phone shot of the scene as well or take a short video just to remind me of the full setting and my phones GPS and location data is much more useful than that on my camera.
I hope this was - (please delete as appropriate):
- Helpful
- Interesting
- Made you smile
- An excellent cure for insomnia!
Until next time - Caron x
ABOUT CARON STEELE

Caron studied Zoology at Oxford University and then went on to a career in banking and advertising, before moving to Worcestershire where she runs a farm with her husband and is constantly hectic - running offices, a wedding venue and conference centre. Her son has also suffered very badly with depression, and as a mother that has been extremely hard to cope with.
To take time out to focus on something completely different, she took up photography as a hobby 5 years ago and has found it a great way to improve her everyday performance and well-being.
With her degree in zoology and a passion for conservation, Caron chose to specialise in wildlife photography and has travelled the world following this hobby, including The Arctic, Antarctica, Alaska, Africa, Japan, America, The Galapagos and Iceland. Along the way, she's racked up an impressive lists of awards that include:
- 2017 British Wildlife Photography Awards - Coast & Marine Category Winner
- 2017 Nature’s Best Photography Awards Africa - Mammal Portraits Category Winner
- 2017 Nature’s Best Backyards Photography Competition Winner
- 2018 National Geographic Traveller Photography Competition Portfolio Runner Up
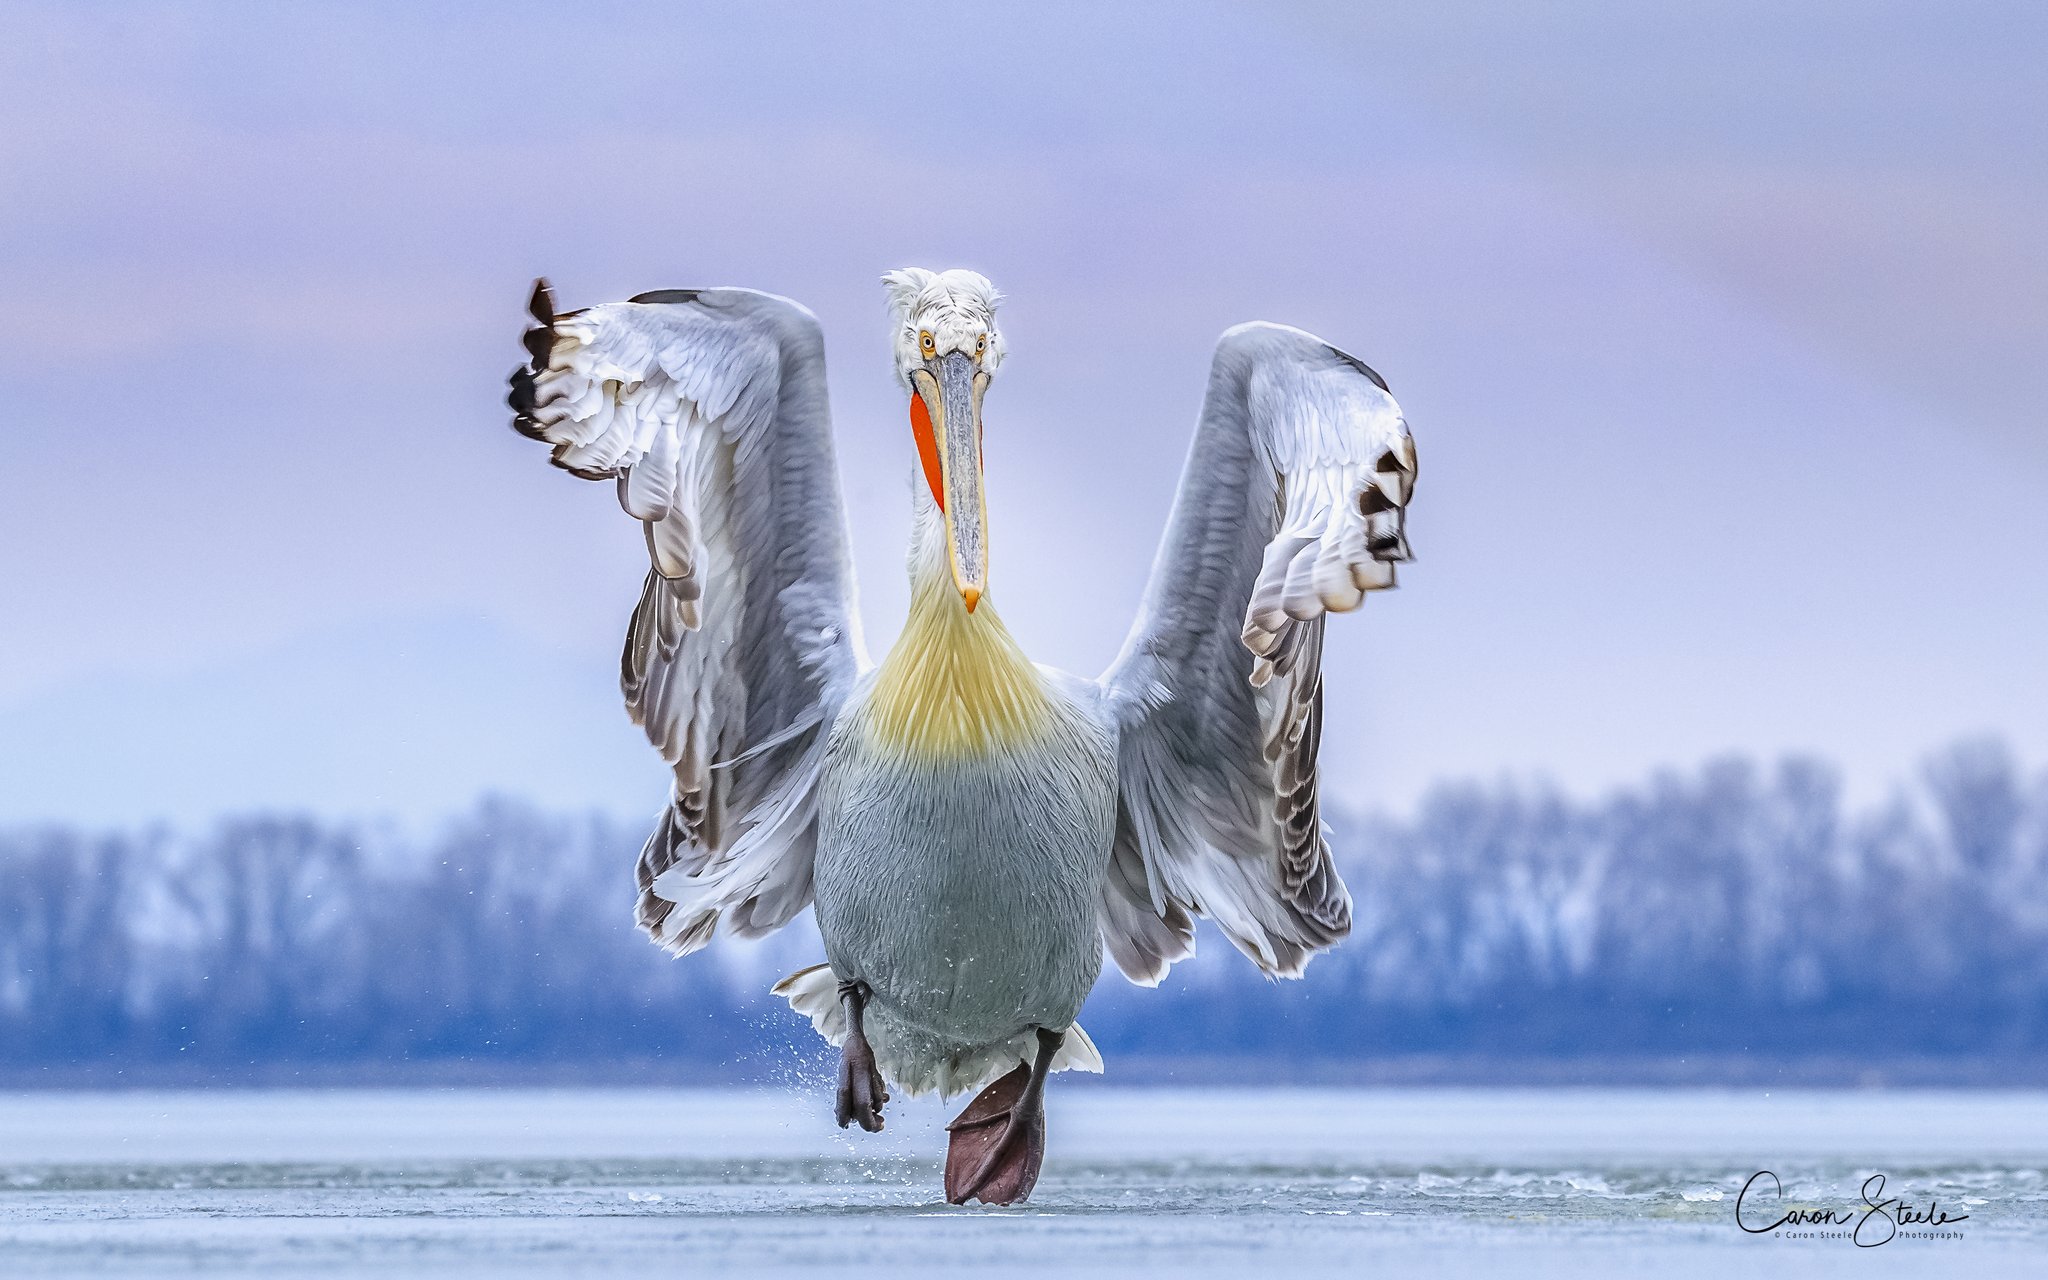
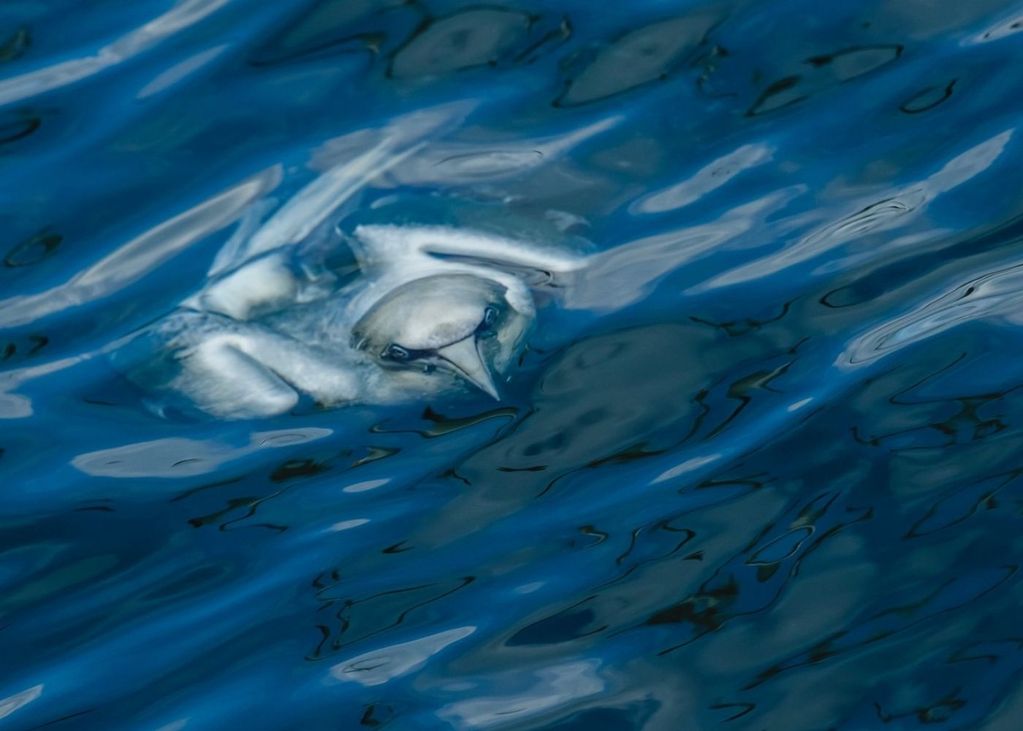
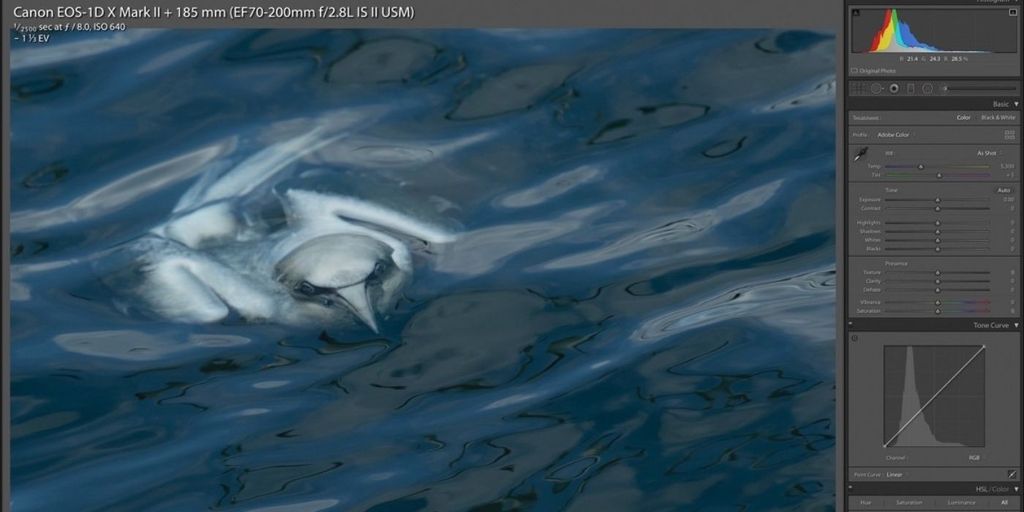
Caron has also just won the 2019 Bird Photographer of the Year Competition Winner, which included Chris Packham on the judging panel, with a Dalmatian Pelican "Dancing On Ice" (see below).
Caron has also recognised that her experience can be used to help young people who are already dealing with incredibly stressful 24 hour lives. She has developed a talk on photography, conservation and mindfulness that she is hoping to deliver to schools around the country. The aim is to encourage a similar passion for the next generation and give them a space to breathe. If schools want Caron to come and talk about her photography adventures around the world, she’d be delighted.