


This entry was posted on August 4, 2020.
Getting your nighttime shots exposed correctly can be a bit tricky but with this guide you will be able to get your exposures bang on each time and banish dark dreary images forever!
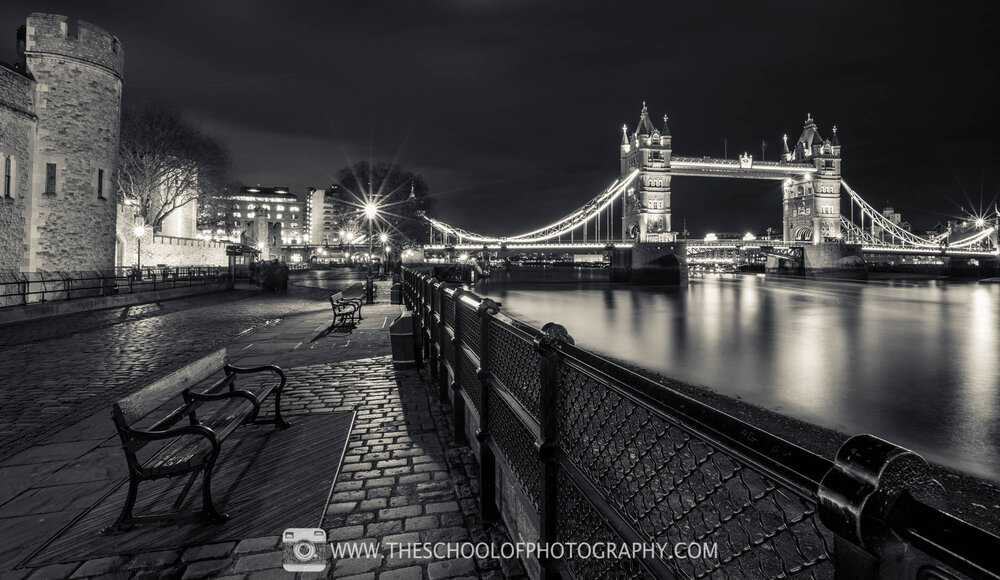
Camera Settings - f 16 - 60 Seconds - ISO 100 - 17mm focal length, full frame Camera
Equipment needed for Night Photography
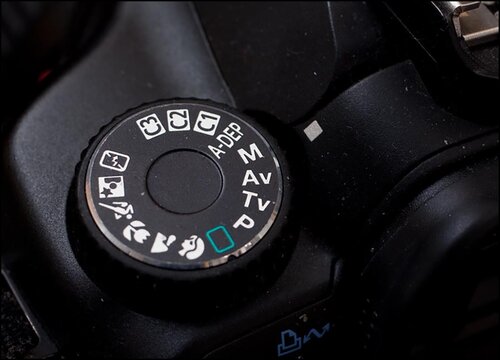
Before we talk about camera settings for Night Photography, let’s talk about the equipment you’ll need. You’ll need a camera that goes into full manual mode. This will enable you to take full control over the camera settings. An easy way to check if your camera has this function is to look at the top of the camera and see if it has a dial with the letter M (for manual) on it. If yours has this, it will be fine for photographing the night.
A standard zoom lens is fine for this type of photography but if you have one, an ultra-wide-angle lens will enable you to get those vast stretched out scenes of bridges over water and alike.
You will need a good sturdy tripod to take the weight of your camera. As it’s dark, exposure times shooting the night sky will be long, therefore your camera needs to be still to avoid accidental blurring.
Whist your taking pictures during night photography you cannot touch the camera as you will get camera shake. To enable this you will need a remote trigger or a cable release, this will enable you to fire off the camera without touching it.
Night Photography Camera Settings
As mentioned previously, you have to go fully manual for this type of photography but don’t let that put you off as it’s a simple set up. Below is how to set up your camera for night photography:
-
M – Manual mode.
-
Shutter Speed – 30 to 60 seconds. As it’s dark, a longer shutter speed will give enough time to let a lot of light to enter the camera. If you find your photography coming out too dark, increase the time, if your photos are coming out too light, decrease the time.
-
Aperture – f8, f11 or f 16. This is to create what’s called a long depth of field and allows you to create an image that is sharp from the foreground to the background. As with the shutter speed, you can make your shots lighter or darker with the aperture. Start at f11 and if the image is too light, go to f16, if it’s too dark, go to f8.
-
ISO – 100 or 200. This is to reduce noise. Noise in an image creates a speckly look with dull colours. To get a clean crisp and colourful night photograph, you will need as little noise as possible.
-
Set White Balance to Auto. Night photography usually has lots of different light sources with lots of different colours. Shooting in Auto White Balance gives you a good middle ground which can be adjusted as needed back in post-processing programs like Lightroom. Another option is to set the camera’s white balance to Daylight. This will capture colours as they are, but I find the photos come out too orange when doing it this way.
-
Manual Focus. As it going to be dark, your camera will find it hard to focus onto something. To tackle this, focus onto something lit in the distance, then switch lens to manual focus to fix the focus point.
Night Photography Techniques
There are plenty of ways to do night photography. The camera settings shown here will create that classic night photograph of the city lights, and if there are rivers, it will make the water look like glass and enhance any reflections. For these types of shots, think carefully about the composition. Diagonals in night photography work well as they create dynamism and enable the eye to flow easily through the frame, especially with bridges.
Although using a standard zoom lens will do the job fine, an ultra-wide-angle lens will help create those vast scenes of the city skyline or long bridges over the river. An ultra-wide-angle lens is usually an extra lens that you have to buy. It will have a focal length of approx. 16mm on a full-frame camera, 11mm on a crop sensor camera and 8mm on a micro 4/3 camera. To put it simply it goes a bit wider than your standard kit lens. If you're not sure, contact one of our team who will be happy to advise!
Although not necessary it’s highly recommended to shoot in Raw and post-process night photography in programs like Lightroom or Photoshop. There are so many lovely colours at night and post-processing will help enhance and boost those colours for a more aesthetic feeling. There is also a lot of contrast in night photography due to the bright lights against the dark sky. Shooting in Raw will give you much more play to lift shadows and deepen highlights within the scene and this in turn, will create a more balanced exposure. If you don’t do this, you could produce shots which look too dark or too bright.
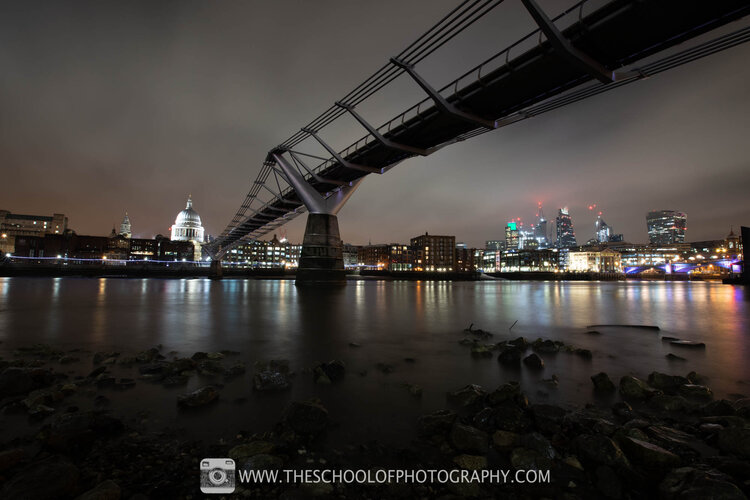
Raw image straight out of camera
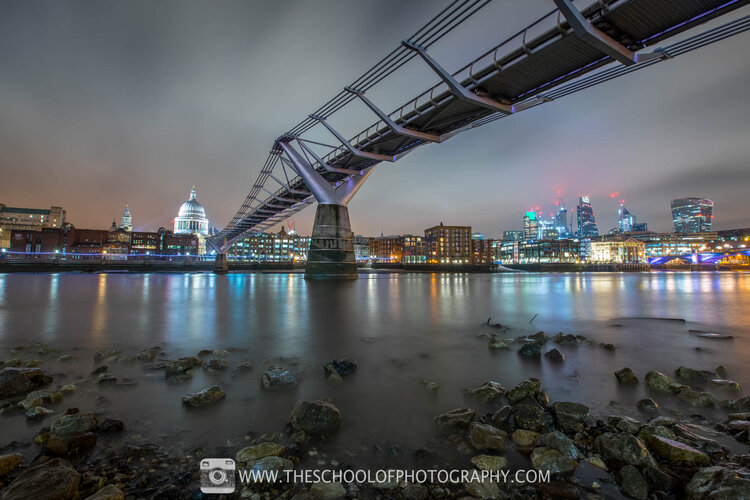
Processed shot using Lightroom. Camera Settings - f 16 – 15 Seconds - ISO 200 - 16mm focal length, full frame Camera
With thanks to the School of Photography for content. Check out their website for plenty of other tutorials and a printable guide to take with you!